
Building a Wood-fired Masonry Oven
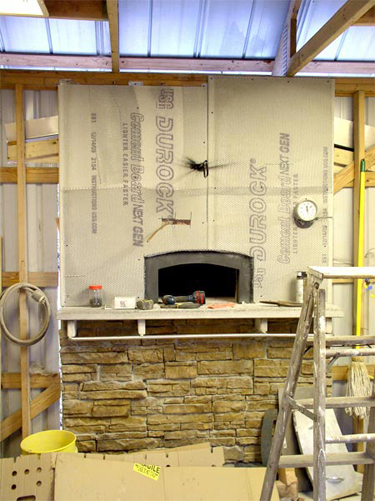
Work on the upper front rock facing ready to begin. Durock® was placed over the steel insert. The polished concrete shelf was attached to the stainless steel support rods, and the gauge for the analog thermometer was positioned at eye-level. The thermocouple readout device found a niche in the wall to the right of the oven face. The polished concrete shelf is in place, supported by the stainless steel rod. The concrete shelf is built into the masonry and the rock facing.

Rock facing nearly complete; visible are the gauge for the analog thermometer (right); the pull handle for the damper control (upper center); and the copper tubing for the steam injection (shown here just above the oven door). On better thought, it was moved away from the center of the oven door to just to the left of the oven door; a minor adjustment.
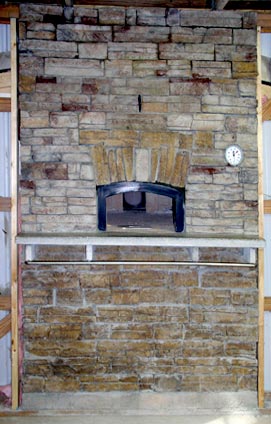
Rustic rock facing inside the bakery is complete, floor to ceiling. The image at left shows the concrete shelf, the stainless steel rod and four embedded supports, and the oven door insert. Through the oven door you can see straight back to the chimney opening at the rear of the oven. Detail of the polished concrete shelf is at right; aggregate enhances the appearance. The shelf is level with the oven door opening so sheet pans loaded with baked goods, and strap pans of bread easily rest here before sliding directly into the hot oven. The stainless steel rod projects slightly in front of the shelf, making a convenient place to hang a towel.
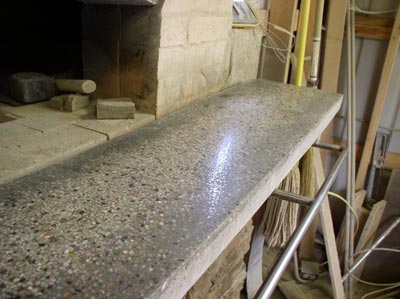
We used a bit of blue quartz aquarium gravel and creek gravel mixed to dress up the surface. The frame was built upside down, then the aquarium gravel/cement mix was poured about 1/4
inch deep, with the quickcrete poured for the remainder of the inch
and-a-half. For strength a couple of pieces of #3 rebar about half depth
of the countertop was put in place for the full length of the 65" pour. We also put in a piece of expanded metal lath through the center of the pour. It was necessary to firmly beat the frame edges and the bottom to
ensure there would be no voids in the exposed top surface when it was
returned to the upright position.
After polishing with wet diamond polishing pads, starting out with a fairly
coarse grit and ending with 800 grit, all those little bits of quarts
shining through make an attractive, very durable, heat-proof oven entry and
bread pan landing zone.
So far, no cracks. It gets a little warm right in front of the oven door so
I've elected to leave the surface unsealed. Any wax or sealant would
probably not survive the heat.
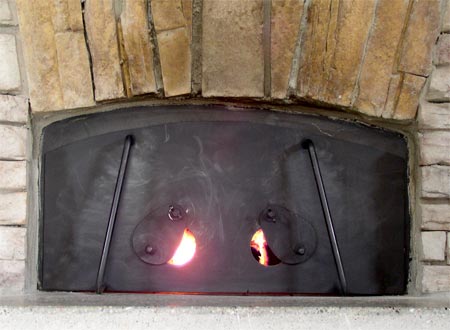 The oven door was made for us by a machinist from sheet steel with two easy-grip handles, and two sliding vent openings to control airflow directly across the burning wood in the oven chamber. The door fits snuggly into the opening between the rock facing and against the door insert. The two handles act as props to keep the door standing level, and pressed into the oven door opening.
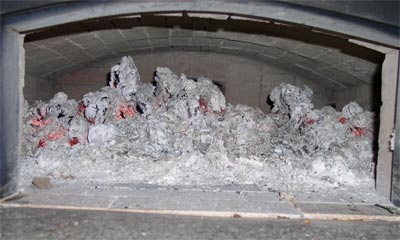
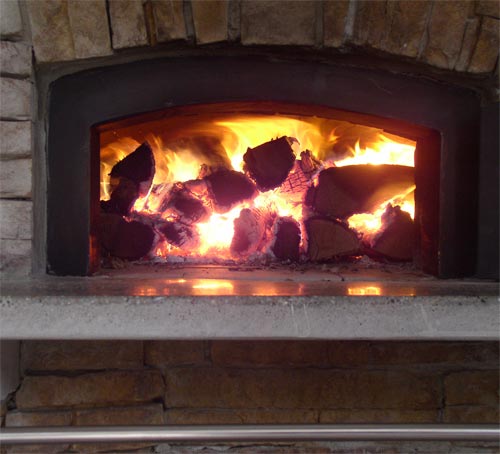
Image above shows the remains the fire 7 hours after initial firing; several more logs were placed in the fire during that time to maintain a good, continuous burn with the flue damper closed to about 1/4 airflow, the door vents were similarily closed to about 1/4 opening to allow good air flow across the fire without losing too much valuable heat up the chimney. Because this above image looks like a dying fire, the image at right was taken at the same time, but without camera flash, so you can see the extensive heat remaining in the coals. Lots of infrared going on here! The temperature readings for the shallow dome and shallow hearth were 930°F and 688°F, respectively. Deep dome temperatures were on the rise (471°F), absorbing the heat from the hot fire in the oven chamber. Three hours later the deep dome was 575°F, and still rising. Seven hours after this image was made, when the coals were scattered and the oven shut down, the deep dome temperature had reached 625°F.
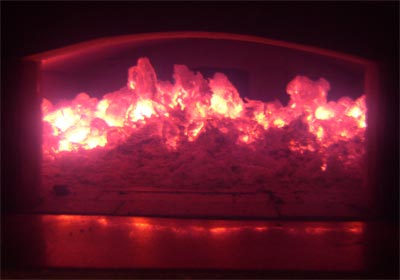
Image made without camera flash to show the extreme amount of heat still in the hot coals. In 7 more hours, these coals were burned to a pile less than 2 inches deep. These were scattered over the entire hearth floor, the damper closed completely, and the door vents shut (12 hours after initial firing). The oven will be ready to bake at stabilized temperatures of 500°F to 550°F about 7 hours later; very little ash remained on the hearth. The ambient air temperature was in the low 30s (F) during this firing sequence of about 24 hours, total time. There is enough stored heat to bake "artisan" breads in this oven for two days. Residual heat remaining after that is in the range of 350°F and it will remain stable at 350°F for more than 48 hours.
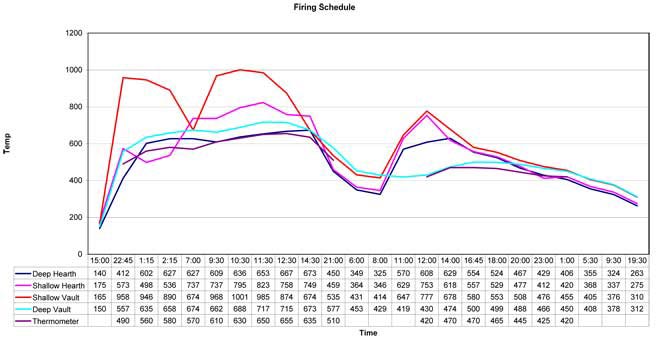
This is a graph of a test firing schedule showing times and temperatures from the four embedded thermocouples, and the analog thermometer (read from left to right; military times; thermocouples are labeled down the lower left side). Sixteen hours after the first firing, the oven was refired, as indicated by the second spike. Forty hours into the firing, a third fire was built, using just a small bit of wood (third spike). This chart represents nearly 80 hours of heat retention in the oven. The test was done before all the insulation was in place, so heat retention at this time was not as good as later when the installation of the second ceramic blanket and fiberglass insulation was completed, and the oven space completely enclosed. The graph was plotted using a spreadsheet program. The graph indicates the efficiency of this oven, and potential for continuous bread baking over more than a three day period, with minimal reheating.
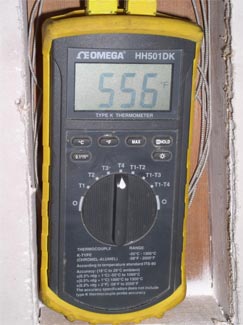

At the left is the thermocouple readout device showing a temperature of 556°(F) on the T4 thermocouple, which is embedded in the deep vault/arch in the dome of the oven (four inches from the fire chamber). The image above is the gauge for the analog thermometer embedded in a similar position in the deep vault. The readings are nearly identical.
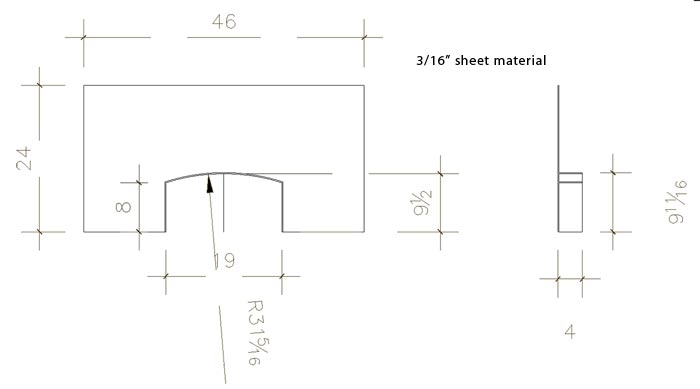
Schematic drawing of oven faceplate to be made from 3/16 inch sheet steel